Broadcast
Broadcast lets you send the same message (or a personalized variant) to hundreds or thousands of contacts at once — perfect for promotions, product launches, newsletters, and event reminders.
Where to Find It
Sidebar → CORE → Broadcast — https://app.wabot.io/dashboard/broadcast
Before You Create a Broadcast
Complete these checks first:
- Connect the WhatsApp account you will send from.
- Create and validate a Broadcast List, or confirm that the subscriber segment you intend to target is correct.
- Prepare any media in the File Manager.
- For an Official API marketing conversation, make sure the required Meta-approved template has been synced in Templates → Pre-Approved.
- Send a test message to a controlled recipient before scheduling a large campaign.
Only send to recipients who have opted in. A valid phone number is not the same as consent to receive marketing messages.
The Broadcast List Page
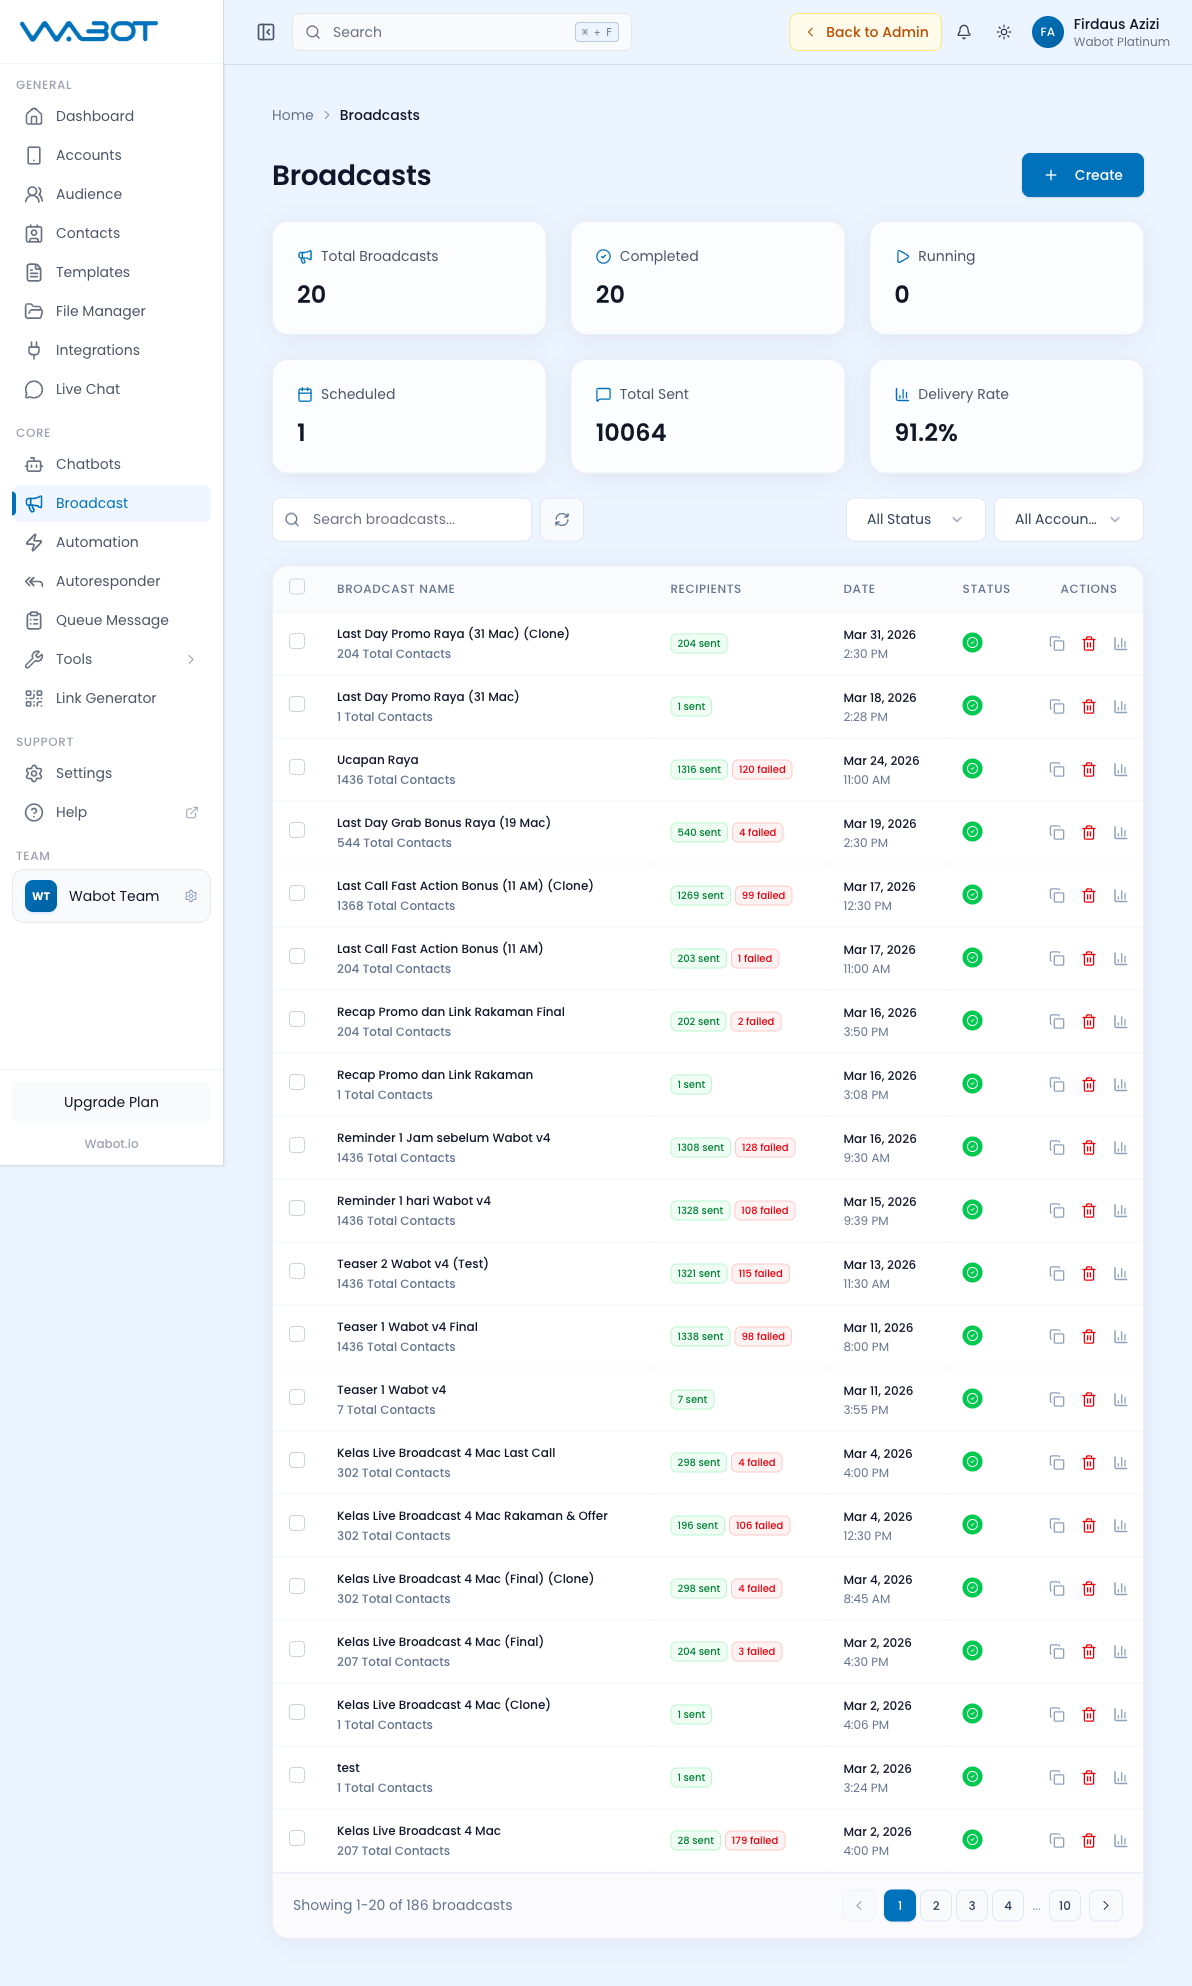
When you open Broadcast, you see a table with columns:
- Broadcast name
- Account used
- Audience
- Status (Draft, Scheduled, Sending, Completed, Failed)
- Stats (sent / delivered / read / failed)
- Created date
- Actions, such as Report, Clone, and Delete
At the top right: Create button.
Use the search, account, and status filters to find a campaign. Select rows only when you intend to apply a bulk action.
Creating a Broadcast
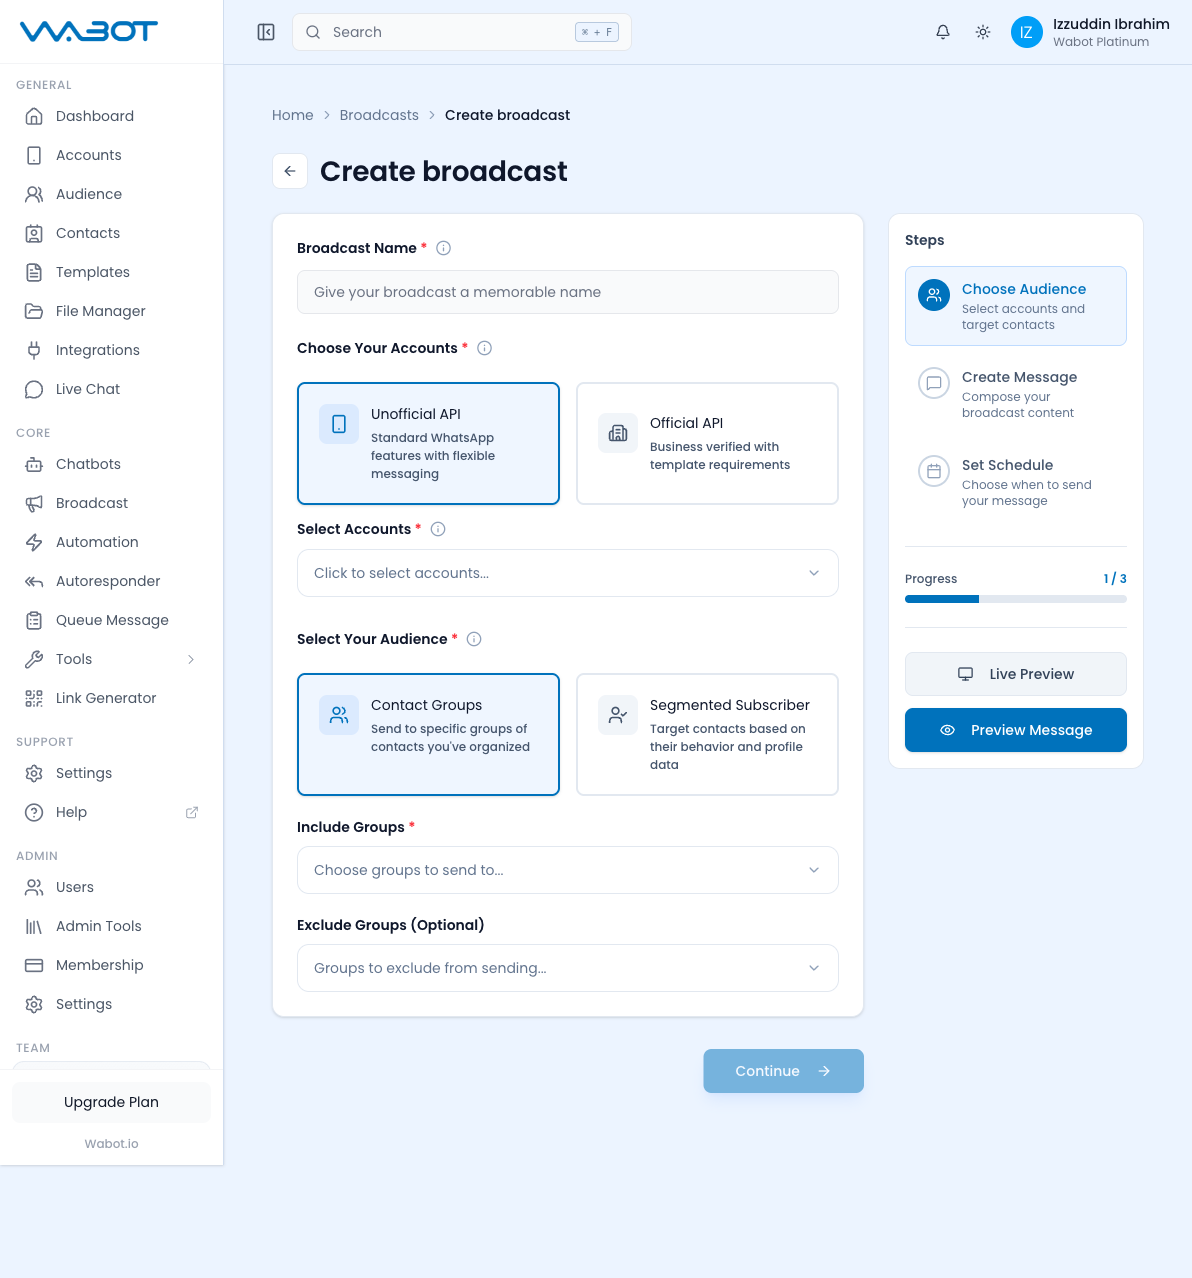
Click Create to open the 3-step wizard at /dashboard/broadcast/new.
Step 1 — Account & Audience
Fill in:
- Broadcast Name * — an internal label (e.g. "March Promo Blast")
- Choose one account type:
- Unofficial API — standard WhatsApp features with flexible messaging
- Official API — business verified with template requirements
- Select the connected WhatsApp account. Official API broadcasts use one account; Unofficial API can use the account selection available to your workspace.
- Select an audience type:
- Contact Groups — send to one or more recipient groups or Broadcast Lists
- Segmented Subscriber — target subscribers based on behavior and profile data
- For Contact Groups, choose Include Groups and optionally Exclude Groups. For Segmented Subscriber, define conditions and optionally include or exclude groups.
- Confirm the recipient estimate before you continue. Recipient counts can be masked if your role does not include audience access.
Click Continue.
Step 2 — Create Message
- Choose Regular or Template format when the selected Official API account requires it.
- Choose a single message or, when your role allows it, multiple regular-message blocks.
- Compose the text and add media, such as an image, video, document, or audio.
- Insert supported placeholders, such as
{name},{phone}, and contact custom fields. - Select a saved message template when you need an interactive message or a pre-approved Official API template. Polls are not available for Official API broadcasts.
- Check the live preview.
- Use Test Message with a controlled recipient if the option is available.
Click Continue.
Step 3 — Schedule & Send
- Send Now — dispatch immediately after final confirmation.
- Schedule — pick a date and time. Re-check the account timezone before saving.
Review the account, recipient estimate, exclusions, message preview, and schedule. Click Send or Schedule only when all values are correct.
The Steps Sidebar
The wizard shows a Steps sidebar on the right with:
- Account & Audience — Select an account and target contacts
- Create Message — Compose your broadcast content
- Schedule & Send — Choose when to send your message
- Progress — e.g.
1 / 3 - Live Preview — Visual preview of your message
Monitoring a Running Broadcast
After sending, the broadcast appears in the main list with its status:
- Pending / Queued — waiting to start
- Sending — dispatch in progress, shows
X / Y sent - Completed — all messages dispatched
- Failed — partial or total failure (check errors)
Click Report to view:
- Overview and Engagement report tabs
- Delivered, read, reply, and failure counts
- Recipient logs, search, error details, and message/reply details
- Refresh Replies when reply statistics are available
Control a Campaign
From the broadcast list or detail page, the available actions depend on the campaign status:
- Pause a running campaign to stop additional messages from being dispatched.
- Open the campaign to use the status-specific controls:
- Resume continues a paused, failed, or cancelled campaign with eligible remaining recipients.
- Restart is available for failed or cancelled campaigns when you need to launch the campaign again.
- Force Restart is in More actions for a campaign that has not completed. Use it only after checking the audience and duplicate-send risk.
- Reprocess Failed appears in More actions for a completed campaign that has failed recipients. It queues only failed recipients, not normal delivered recipients.
- Retry Unknown may appear in the report for an Unofficial API campaign with unconfirmed delivery. Unknown recipients are excluded from normal resume and failed-recipient reprocessing because retrying them may create duplicates.
- Clone creates a separate copy. Use it when you want to resend a completed campaign to a revised audience or at a new date, while preserving the original report.
- Delete only drafts or records you no longer need. Export the report first if it is needed for audit or reporting.
Use Clone for a new full campaign, Reprocess Failed for failed recipients, and Resume for eligible remaining recipients. Check the report and recipient counts before selecting any retry option.
Retarget Recipients From a Completed Broadcast
Without audience access, recipient phone numbers and reply content can be masked, and audience-dependent exports or retargeting are unavailable.
Use Retarget when the follow-up audience should be selected from the original broadcast's result, rather than the original Broadcast List.
- In Broadcast, click Report for the completed campaign.
- In the report header, click Retarget.
- Enter a distinct Broadcast Name.
- Choose Recipients to Include:
- Read to follow up recipients who opened/read the campaign.
- Not Read to follow up delivered recipients who did not read it.
- Not Reply or Replied to target by reply outcome.
- Pending, Sent, Not Delivered, Delivered, or Failed to target delivery states.
- All Recipients only when intentionally re-engaging the complete original audience.
- Confirm the Estimated Recipients count.
- Click Create Draft.
- Review the new draft's message and schedule, then send or schedule it.
Wabot creates a separate draft with a locked temporary retarget audience. The original broadcast and its report remain unchanged. Retarget is shown only to users with Broadcast write and audience access.
Do not target Read, Delivered, or All Recipients unless the follow-up content and timing are intentional. Recipients in these states have already received the original campaign.
Best Practices
- ✅ Get explicit opt-in consent before sending promotional messages
- ✅ Start with small batches (50–100) before scaling to thousands
- ✅ Segment by relevance — generic messages get blocked
- ✅ Personalize with
{name}and contextual fields - ✅ Send during business hours in the recipient's timezone
- ✅ Include a clear CTA (reply, link, phone number)
- ✅ Provide an opt-out ("reply STOP to unsubscribe")
- ❌ Send unsolicited bulk messages — your number will get banned
- ❌ Exceed your plan's monthly message quota
- ❌ Use identical messages for thousands at once — vary slightly
- ❌ Blast the same list multiple times per week
- ❌ Include prohibited content (spam, scams, illegal products)
Avoiding WhatsApp Bans
- Warm up new numbers gradually (start with 50 msgs/day, increase over 2 weeks)
- Keep message content relevant and useful
- Respond to replies quickly (don't leave customers hanging)
- Use Wabot's pacing controls to throttle send rate
- Monitor feedback — if replies contain "stop" or complaints, pause the broadcast
See also: Audience & Groups · Contacts · Templates